
Kaazing is well-known for a multitude of products based on the WebSocket IETF and W3C standard. Using WebSocket allows us to extend different asynchronous, message-oriented infrastructure such as JMS and AMQP easily and securely over the Web.
NGINX is another awesome tool. It is one of the world’s most popular, high-powered web servers. Many of the large websites on the planet prefer NGINX as their web server of choice.
Wouldn’t it be really cool to combine the secure messaging features of the Kaazing Gateway together with the high-performance Nginx web server? Your hyper fast website would have additional security measures to protect your internal network from unauthenticated users and you’d be able to automagically connect to internal enterprise messaging systems without learning brand-new APIs.
Now that’s a powerful combination. Let’s set up a deployment to get the best of both.
We can have incoming WebSocket-based messaging requests passed through an Nginx webserver (proxy) instance to a Kaazing WebSocket Gateway server instance. Normal incoming HTTP/S traffic would be directly handled by Nginx.
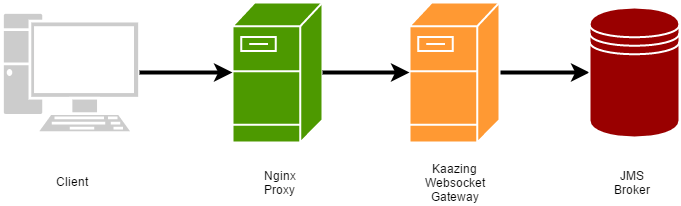
This topology also allows us to avoid exposing the internal URL or private infrastructure information that hosts the Kaazing WebSocket Gateway server (which is a simple Java process btw).
Configuring the Kaazing Gateway
The first step is to download the Kaazing WebSocket Gateway if you haven’t already. I’m
using the standalone JMS Edition 4.0 on Windows that you can find here. Once you’ve unzipped the file, we’ll want to make one change to the default gateway config file (gateway-config.xml). This file is located in the conf subdirectory below your install directory:
Down the middle of the page of the gateway-config.xml file, within the JMS <service>
tag, we’ll need to change this (parameterized) line here
<allow-origin>
    http://${gateway.hostname}:${gateway.extras.port}
</allow-origin>
This property is enabled for security reasons by default. This setting will block incoming websocket connections if the request is NOT originating from the specified host (${gateway.hostname}) and port (${gateway.extras.port}). In a non-proxy topology, you would typically keep the origin URL (typically coming from a browser) set for protection. But in our case, Nginx will be proxying the connection coming from a different port than the actual origin. For the purposes of development simplicity, let’s change this setting:
<allow-origin>*</allow-origin>
Using “*” allows WebSocket connections from any origin through to the JMS service. In production, you will definitely want to strengthen security. The security documentation for the Kaazing Gateway has detailed information for enhanced security.
Starting the Gateway and Message Broker
The Kaazing Gateway is designed to work out-of-the-box with any JMS 1.1 compliant message broker. For convenience , the binary version of the popular message broker ActiveMQ is included in the distribution. In addition, the gateway-config.xml configuration file has a simple, default configuration for ActiveMQ.
Let’s start the Kaazing WebSocket Gateway and the ActiveMQ message broker. The startup scripts for both are located in the bin subdirectory.
> kaazing-websocket-gateway-jms-4.0.9apache-activemq-5.10.0/bin/activemq.bat

> kaazing-websocket-gateway-jms-4.0.9/bin/gateway.start.bat
Configuring Nginx
The last step is to install and configure Nginx. Setup is very easy. The installation documentation on the Nginx website can help you. Below is my configuration for my nginx.conf file.
events {
 worker_connections 1024;
}
http {
 server {
 listen 9000;
 #websocket
 location /jms {
 proxy_pass http://localhost:8001/jms;
 proxy_http_version 1.1;
 proxy_set_header Upgrade $http_upgrade;
 proxy_set_header Connection quot;upgradequot;;
 }
 location / {
 proxy_pass http://localhost:8001;
 }
 }
}
I’ve stripped the Nginx configuration down to the bare minimum. This configuration simply proxies requests through to the Kaazing Gateway server.
Now we simply start up Nginx.
At this point, we have an instance of Nginx acting as a normal webserver handling HTTP requests and also acting as a WebSocket proxy. The JMS-over-WebSocket requests (identified by http://localhost:8001/jms are passed through Nginx and handled by an instance of the Kaazing WebSocket Gateway. The Gateway takes that connection request and handles it as it would have if there were no proxy and completes the connection to the instance of the ActiveMQ message broker. Everything is now in place for a full integration test.
Testing our Complete Configuration
Included with the Kaazing Gateway is a simple JavaScript publish/subscribe messaging
demonstration. We can use this demo to test our full setup.
Start your favorite browser and visit this URL:
http://localhost:9000/demo/jms/javascript/jms.html
If you look in the Location textfield, you will see the URL: ws://localhost:9000/jms
Notice the port we are using here, i.e., 9000. This is the port that we configured our nginx server to listen on, which means Nginx served up the webpage. Next click on the Connect button. If we’ve done everything correctly, we should see “CONNECTED” in the “Log messages” text area to the right.

Voila! We have successfully allowed a WebSocket connection to pass through Nginx, connect with the Kaazing Gateway and subsequently connect to the back-end ActiveMQ message broker. I will leave the subscribe and publish fun of the demo app up to you!