
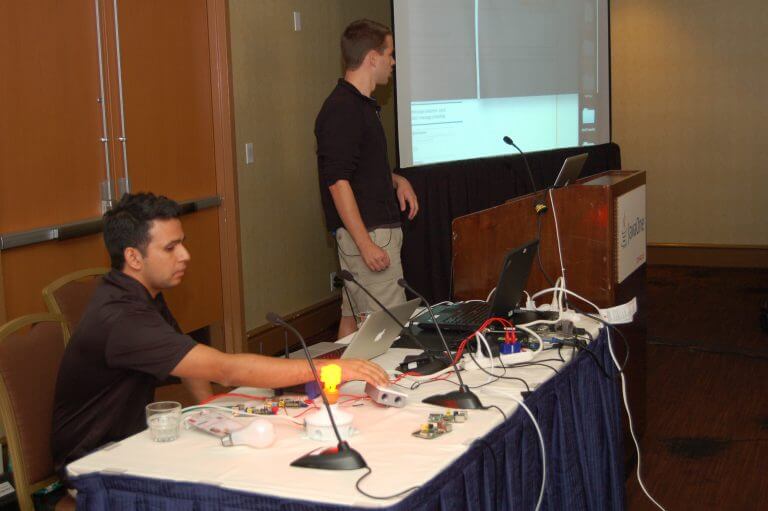
Two visionary Kaazing engineers, David Witherspoon and Prashant Khanal, gave an exciting presentation at JavaOne this year: JMS, WebSocket, and the Internet of Things — Controlling Physical Devices on the Real Time Web.
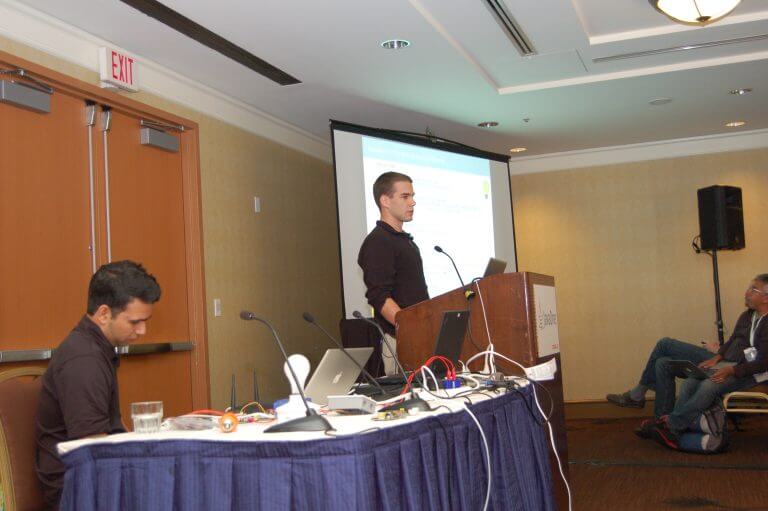
David and Prashant led the audience through the steps of building connected Things by combining open source hardware, a Raspberry Pi, with real-time Web communication and messaging, powered by Kaazing.
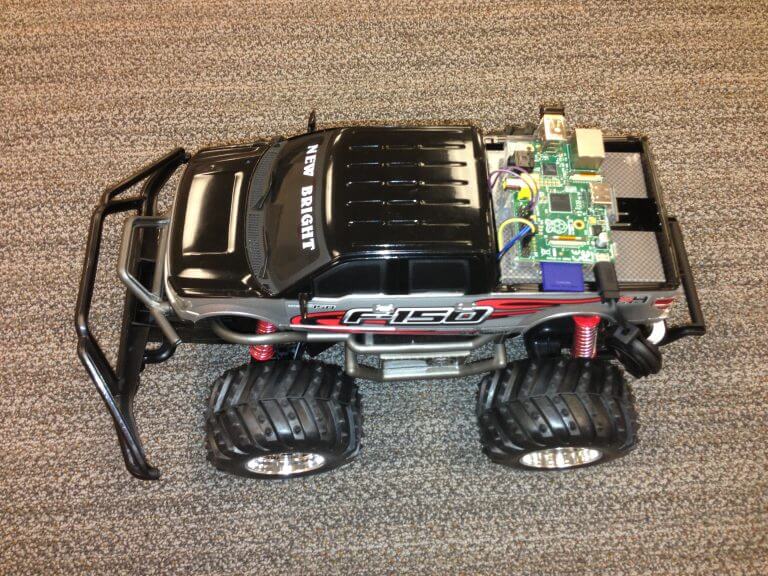
They started off by demonstrating Kaazing’s remote controlled truck. A remote member of the team joined the presentation over Skype and used a Web browser on his smart phone to control the truck in the conference room.
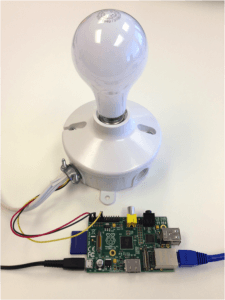
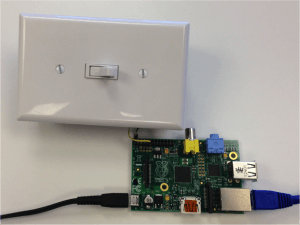
Next, they walked the audience through building similar M2M systems. David and Prashant used the simplest “machines” for their demonstrations: a light bulb and a switch, each connected to a Raspberry Pi. All it took was three basic steps.
1. Connecting Hardware with Software – the Magic of the Raspberry Pi
The software stack installed on the two Raspberry Pis:
This step consisted of two sub-steps. First, Prashant and David demonstrated how to leverage software running on the Pi to turn the light on/off. Then, they showed how the Raspberry Pi can detect the on/off state changes of the switch. It’s important to note that in this step, a switch was connected to a Pi and a lightbulb was connected to another Pi; the switch and the lightbulb (the two Things) are not yet connected.
Watch David demonstrate how software controls the two hardware pieces, the light and the switch.
Source Code for the Light
[code language=”java” collapse=”1″ highlight=”16,17,21,22,26,27,39,41″]
package com.kaaazing.demo.light;
import com.pi4j.io.gpio.GpioController;
import com.pi4j.io.gpio.GpioFactory;
import com.pi4j.io.gpio.GpioPinDigitalOutput;
import com.pi4j.io.gpio.PinState;
import com.pi4j.io.gpio.RaspiPin;
public class Light {
private final GpioController gpio;
private final GpioPinDigitalOutput gpioPin;
public Light() {
gpio = GpioFactory.getInstance();
gpioPin = gpio.provisionDigitalOutputPin(RaspiPin.GPIO_01,
"MyLight", PinState.LOW);
}
public void on() {
gpioPin.high();
System.out.println("Light on");
}
public void off() {
gpioPin.low();
System.out.println("Light off");
}
public void shutdown() {
gpio.shutdown();
}
public static void main(String[] args) {
Light lightController = new Light();
System.out.println("Light controller initialized");
try {
Thread.sleep(2000);
lightController.on();
Thread.sleep(2000);
lightController.off();
Thread.sleep(2000);
lightController.on();
Thread.sleep(2000);
lightController.off();
} catch (InterruptedException e) {
e.printStackTrace();
} finally {
lightController.shutdown();
}
}
}
[/code]
First, in lines 16-17 a General Purpose I/O (GPIO) output pin is initialized. Then, in the on() and off() methods we set its value to high (line 21) and low (line 26). Eventually, we invoke the on() and off() methods.
Note: For the entire source code, scroll to the bottom of this post.
Source Code for the Switch
[code language=”java” collapse=”1″ highlight=”23,24,25,35,43,44,45,46,47,51″]
package com.kaaazing.demo.toggle;
import java.util.concurrent.CopyOnWriteArrayList;
import com.pi4j.io.gpio.GpioController;
import com.pi4j.io.gpio.GpioFactory;
import com.pi4j.io.gpio.GpioPinDigitalInput;
import com.pi4j.io.gpio.PinPullResistance;
import com.pi4j.io.gpio.PinState;
import com.pi4j.io.gpio.RaspiPin;
import com.pi4j.io.gpio.event.GpioPinDigitalStateChangeEvent;
import com.pi4j.io.gpio.event.GpioPinListenerDigital;
public class Toggle {
private final GpioController gpio;
private final GpioPinDigitalInput gpioPin;
private final CopyOnWriteArrayList listeners;
public Toggle() {
listeners = new CopyOnWriteArrayList();
gpio = GpioFactory.getInstance();
gpioPin = gpio.provisionDigitalInputPin(RaspiPin.GPIO_00,
PinPullResistance.PULL_DOWN);
gpioPin.addListener(new GpioPinListenerDigital() {
@Override
public void handleGpioPinDigitalStateChangeEvent(
GpioPinDigitalStateChangeEvent event) {
notifyListeners(event.getState());
}
});
}
private void notifyListeners(PinState state) {
if (state == PinState.HIGH) {
System.out.println("Toggle on");
} else {
System.out.println("Toggle off");
}
for (ToggleListener listener : listeners) {
if (state == PinState.HIGH) {
listener.on();
} else {
listener.off();
}
}
}
public void registerListener(ToggleListener listener) {
listeners.add(listener);
// send initial state
if (gpioPin.getState() == PinState.HIGH) {
listener.on();
} else {
listener.off();
}
}
public void shutdown() {
gpio.shutdown();
}
public static void main(String[] args) {
Toggle toggle = new Toggle();
System.out.println("Running toggle for 20 seconds");
try {
Thread.sleep(20000);
} catch (InterruptedException e) {
e.printStackTrace();
} finally {
toggle.shutdown();
}
System.out.println("Exiting");
}
}
[/code]
[code language=”java”]
package com.kaaazing.demo.toggle;
public interface ToggleListener {
public void on();
public void off();
}
[/code]
For the switch, first we initialize an input pin, and then write the listener code waiting for the toggle event.
Note: For the entire source code, scroll to the bottom of this post.
2. Pub-Sub Messaging to Build a Loosely Coupled System – Introducing the Message Broker
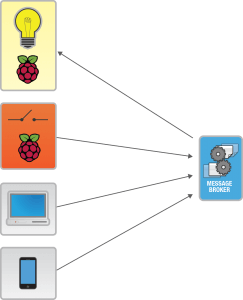
Next, David and Prashant demonstrated how to connect the lightbulb and its Pi with the switch and its Pi. While it’s easy enough to connect the switch and the lightbulb directly, they wanted to show the power of the publish-subscribe (pub-sub) messaging model, which lets you build a real-life system. By using a pub-sub model, one Thing can send a message to another Thing via a message broker to send signals to each Thing. To illustrate this, David and Prashant used the open source Apache ActiveMQ JMS message broker that ships pre-packaged with the JMS Edition of Kaazing WebSocket Gateway, but you can use a variety of JMS message brokers to achieve the same result. Kaazing WebSocket Gateway integrates with a number of different JMS message brokers, including TIBCO Enterprise Message Service, Informatica Ultra Messaging, IBM WebSphere MQ, JBoss Messaging, Open MQ Messaging, and Oracle WebLogic JMS.
In this case, the Pi attached to the switch is the publisher, and the Pi attached to the light is the subscriber.
Watch David demonstrate the connected scenario.
Source Code for the Light
[code language=”java” collapse=”1″ highlight=”31,33,34,35,36,37,38,39,40,43,48,49,50,51,52,53,54,55″]
package com.kaaazing.demo.light;
import java.net.URI;
import javax.jms.Connection;
import javax.jms.JMSException;
import javax.jms.Message;
import javax.jms.MessageConsumer;
import javax.jms.MessageListener;
import javax.jms.Session;
import javax.jms.TextMessage;
import javax.jms.Topic;
import org.apache.activemq.ActiveMQConnectionFactory;
import com.kaaazing.demo.util.AbstractJmsMessenger;
import com.kaaazing.demo.util.DefaultExceptionListener;
public class LightJmsTcpController extends AbstractJmsMessenger {
private final ActiveMQConnectionFactory connectionFactory;
private final Connection connection;
private final Session session;
private final Topic topic;
private final MessageConsumer consumer;
private final Light light;
private boolean running = true;
public LightJmsTcpController() {
try {
light = new Light();
connectionFactory = new ActiveMQConnectionFactory(URI.create("tcp://"
+ BROKER_HOSTNAME + ":61616"));
connection = connectionFactory.createConnection();
connection.setExceptionListener(new DefaultExceptionListener());
session = connection.createSession(false, Session.AUTO_ACKNOWLEDGE);
topic = session.createTopic(LIGHT_TOPIC);
consumer = session.createConsumer(topic);
consumer.setMessageListener(new MessageListener() {
@Override
public void onMessage(Message message) {
try {
TextMessage textMessage = (TextMessage) message;
String messageData = textMessage.getText();
System.out.println("message received: " + messageData);
if (messageData.equals(ON_MESSAGE)) {
light.on();
} else if (messageData.equals(OFF_MESSAGE)) {
light.off();
} else if (messageData.equals(SHUTDOWN)) {
System.out.println("shutting down");
shutdown();
}
} catch (JMSException e) {
e.printStackTrace();
shutdown();
}
}
});
connection.start();
System.out.println("Light initialized");
} catch (JMSException e) {
shutdown();
throw new RuntimeException(e.getMessage());
}
}
private void shutdown() {
running = false;
if (light != null) {
light.shutdown();
}
if (connection != null) {
try {
System.out.println("Cleaning up resources");
connection.close();
} catch (JMSException e) {
throw new RuntimeException(e.getMessage());
}
}
}
public static void main(String[] args) throws JMSException, InterruptedException {
LightJmsTcpController lightController = new LightJmsTcpController();
while (lightController.isRunning()) {
Thread.sleep(1000);
}
System.out.println("Exiting Application");
}
public boolean isRunning() {
return running;
}
}
[/code]
In this demo first we create an instance of the Light class (line 31), then a TCP connection to ActiveMQ (lines 33-35). Then, we create a JMS session (line 37), a topic (line 38), and a consumer (line 39), and define the message listener (line 40) that’s invoked when a new message arrives. Depending on the message, the light is turned on or off (lines 48-55).
Note: The entire source is available on github.
Source Code for the Switch
[code language=”java” collapse=”1″ highlight=”35,37,38,39,40,41,42,43,46,78,89″]
package com.kaaazing.demo.toggle;
import java.net.URI;
import javax.jms.Connection;
import javax.jms.JMSException;
import javax.jms.Message;
import javax.jms.MessageConsumer;
import javax.jms.MessageListener;
import javax.jms.MessageProducer;
import javax.jms.Session;
import javax.jms.TextMessage;
import javax.jms.Topic;
import org.apache.activemq.ActiveMQConnectionFactory;
import com.kaaazing.demo.util.AbstractJmsMessenger;
import com.kaaazing.demo.util.DefaultExceptionListener;
public class ToggleJmsTcpListener extends AbstractJmsMessenger implements
ToggleListener {
private final ActiveMQConnectionFactory connectionFactory;
private final Connection connection;
private final Session session;
private final Topic topic;
private final MessageProducer producer;
private final Toggle toggle;
private final MessageConsumer consumer;
private boolean running = true;
public ToggleJmsTcpListener() {
try {
toggle = new Toggle();
connectionFactory = new ActiveMQConnectionFactory(URI.create("tcp://"
+ BROKER_HOSTNAME + ":61616"));
connection = connectionFactory.createConnection();
connection.setExceptionListener(new DefaultExceptionListener());
session = connection.createSession(false, Session.AUTO_ACKNOWLEDGE);
topic = session.createTopic(LIGHT_TOPIC);
producer = session.createProducer(topic);
// clean shutdown listener
consumer = session.createConsumer(topic);
consumer.setMessageListener(new MessageListener() {
@Override
public void onMessage(Message message) {
try {
TextMessage textMessage = (TextMessage) message;
String messageData = textMessage.getText();
if (messageData.equals(SHUTDOWN)) {
System.out.println("shutting down");
shutdown();
}
} catch (JMSException e) {
e.printStackTrace();
shutdown();
}
}
});
connection.start();
System.out.println("Toggle initialized");
toggle.registerListener(this);
} catch (JMSException e) {
shutdown();
throw new RuntimeException(e.getMessage());
}
}
@Override
public void on() {
try {
System.out.println("Sending on message");
producer.send(session.createTextMessage(ON_MESSAGE));
} catch (JMSException e) {
e.printStackTrace();
shutdown();
}
}
@Override
public void off() {
try {
System.out.println("Sending off message");
producer.send(session.createTextMessage(OFF_MESSAGE));
} catch (JMSException e) {
e.printStackTrace();
shutdown();
}
}
private void shutdown() {
running = false;
if (toggle != null) {
toggle.shutdown();
}
if (connection != null) {
try {
System.out.println("Cleaning up resources");
connection.close();
} catch (JMSException e) {
throw new RuntimeException(e.getMessage());
}
}
}
public static void main(String[] args) throws JMSException,
InterruptedException {
ToggleJmsTcpListener toggleJmsTcpListener = new ToggleJmsTcpListener();
while (toggleJmsTcpListener.isRunning()) {
Thread.sleep(1000);
}
System.out.println("Exiting Application");
}
public boolean isRunning() {
return running;
}
}
[/code]
Similar to the lightbulb, for the switch we create a TCP connection to ActivemMQ (line 37-39). After creating the JMS session (line 41), a topic (line 42), we create a JMS message producer (line 43). When the switch is toggled, we create and send a text message (lines 78 and 89) on the topic.
Note: For the entire source code, scroll to the bottom of this post.
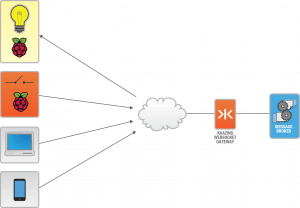
3. Extending the Reach to the Web – WebSocket Transport with Kaazing WebSocket Gateway
The challenge with a TCP-based system, like the one outlined in Step 2, is that TCP has difficulty connecting isolated networks. To use TCP connections, you must open ports on firewalls and address the challenges of penetrating network intermediaries. Also, connectivity with mobile and Web applications raises issues. If you want to build a truly global system, you must ensure that your Things are always connected, no matter what.
The good news is that you can very easily extend your JMS-based applications to the Web, simply by introducing Kaazing WebSocket Gateway in the picture. With Kaazing, you can connect your devices in a secure fashion with low latency using open industry standard Web communication: HTML5 WebSocket.
WebSocket is a natural choice for asynchronous scenarios with event-driven architecture, such as the switch and the light. As the switch is toggled (event), the light (subscriber) is notified of the event asynchronously (without explicitly polling). It’s easy to see that using traditional synchronous Web programming models, like REST, don’t fit the bill as well as the asynchronous pattern that WebSocket supports.
For connected devices, reliability is critical. The moment a connection is lost due to network disruption or other errors, the Kaazing client will automatically try to restore that connection. The Kaazing client libraries will also re-subscribe to any active subscriptions prior to the connection failure.
In this demo, the switch and its Pi can be in Spokane, WA, while the light and its Pi can reside in Kathmandu, Nepal. As long as they’re connected to the public Internet, the JMS messages can traverse the Web, and the switch can control the light.
Watch David demonstrate the WebSocket connected scenario.
Source Code for the Light
[code language=”java” collapse=”1″ highlight=”32,33″]
package com.kaaazing.demo.light;
import java.net.URI;
import javax.jms.Connection;
import javax.jms.JMSException;
import javax.jms.Message;
import javax.jms.MessageConsumer;
import javax.jms.MessageListener;
import javax.jms.Session;
import javax.jms.TextMessage;
import javax.jms.Topic;
import com.kaaazing.demo.util.AbstractJmsMessenger;
import com.kaaazing.demo.util.DefaultExceptionListener;
import com.kaazing.gateway.jms.client.stomp.StompConnectionFactory;
public class LightJmsWsController extends AbstractJmsMessenger {
private final StompConnectionFactory connectionFactory;
private final Connection connection;
private final Session session;
private final Topic topic;
private final MessageConsumer consumer;
private final Light light;
private boolean running = true;
public LightJmsWsController() {
try {
light = new Light();
connectionFactory = new StompConnectionFactory(URI.create("ws://"
+ GATEWAY_HOST + "/jms"));
connection = connectionFactory.createConnection();
connection.setExceptionListener(new DefaultExceptionListener());
session = connection.createSession(false, Session.AUTO_ACKNOWLEDGE);
topic = session.createTopic(LIGHT_TOPIC_WS);
consumer = session.createConsumer(topic);
consumer.setMessageListener(new MessageListener() {
@Override
public void onMessage(Message message) {
try {
TextMessage textMessage = (TextMessage) message;
String messageData = textMessage.getText();
System.out.println("websocket message received: " + messageData);
if (messageData.equals(ON_MESSAGE)) {
light.on();
} else if (messageData.equals(OFF_MESSAGE)) {
light.off();
} else if (messageData.equals(SHUTDOWN)) {
System.out.println("shutting down");
shutdown();
}
} catch (JMSException e) {
e.printStackTrace();
shutdown();
}
}
});
connection.start();
System.out.println("Light initialized");
} catch (JMSException e) {
shutdown();
e.printStackTrace();
throw new RuntimeException(e.getMessage());
}
}
private void shutdown() {
running = false;
if (light != null) {
light.shutdown();
}
if (connection != null) {
try {
System.out.println("Cleaning up resources");
connection.close();
} catch (JMSException e) {
throw new RuntimeException(e.getMessage());
}
}
}
public static void main(String[] args) throws JMSException,
InterruptedException {
LightJmsWsController lightController = new LightJmsWsController();
while (lightController.isRunning()) {
Thread.sleep(1000);
}
System.out.println("Exiting Application");
}
public boolean isRunning() {
return running;
}
}
[/code]
Notice that when switching from TCP to WebSocket, the only change you have to make to your code is replace the connection factory class, the protocol, and the port number.
Note: For the entire source code, scroll to the bottom of this post.
Source Code for the Switch
[code language=”java” collapse=”1″ highlight=”35,36″]
package com.kaaazing.demo.toggle;
import java.net.URI;
import javax.jms.Connection;
import javax.jms.JMSException;
import javax.jms.Message;
import javax.jms.MessageConsumer;
import javax.jms.MessageListener;
import javax.jms.MessageProducer;
import javax.jms.Session;
import javax.jms.TextMessage;
import javax.jms.Topic;
import com.kaaazing.demo.util.AbstractJmsMessenger;
import com.kaaazing.demo.util.DefaultExceptionListener;
import com.kaazing.gateway.jms.client.stomp.StompConnectionFactory;
public class ToggleJmsWsListener extends AbstractJmsMessenger implements
ToggleListener {
private final StompConnectionFactory connectionFactory;
private final Connection connection;
private final Session session;
private final Topic topic;
private final MessageProducer producer;
private final Toggle toggle;
private final MessageConsumer consumer;
private boolean running = true;
public ToggleJmsWsListener() {
try {
toggle = new Toggle();
connectionFactory = new StompConnectionFactory(URI.create("ws://"
+ GATEWAY_HOST + "/jms"));
connection = connectionFactory.createConnection();
connection.setExceptionListener(new DefaultExceptionListener());
session = connection.createSession(false, Session.AUTO_ACKNOWLEDGE);
topic = session.createTopic(LIGHT_TOPIC_WS);
producer = session.createProducer(topic);
// clean shutdown listener
consumer = session.createConsumer(topic);
consumer.setMessageListener(new MessageListener() {
@Override
public void onMessage(Message message) {
try {
TextMessage textMessage = (TextMessage) message;
String messageData = textMessage.getText();
if (messageData.equals(SHUTDOWN)) {
System.out.println("shutting down");
shutdown();
}
} catch (JMSException e) {
e.printStackTrace();
shutdown();
}
}
});
connection.start();
System.out.println("Toggle initialized");
toggle.registerListener(this);
} catch (JMSException e) {
shutdown();
e.printStackTrace();
throw new RuntimeException(e.getMessage());
}
}
@Override
public void on() {
try {
System.out.println("Sending websocket on message");
producer.send(session.createTextMessage(ON_MESSAGE));
} catch (JMSException e) {
e.printStackTrace();
shutdown();
}
}
@Override
public void off() {
try {
System.out.println("Sending websocket off message");
producer.send(session.createTextMessage(OFF_MESSAGE));
} catch (JMSException e) {
e.printStackTrace();
shutdown();
}
}
private void shutdown() {
running = false;
if (toggle != null) {
toggle.shutdown();
}
if (connection != null) {
try {
System.out.println("Cleaning up resources");
connection.close();
} catch (JMSException e) {
throw new RuntimeException(e.getMessage());
}
}
}
public static void main(String[] args) throws JMSException,
InterruptedException {
ToggleJmsWsListener toggleJmsWsListener = new ToggleJmsWsListener();
while (toggleJmsWsListener.isRunning()) {
Thread.sleep(1000);
}
System.out.println("Exiting Application");
}
public boolean isRunning() {
return running;
}
}
[/code]
Interestingly, the source code used for the WebSocket-enabled scenario is almost identical to the one used in Step 2. As the highlighted code snippet indicates (lines 35-36), all you need to change is the connection information: simply modify the connection factory, the protocol, and the port number.
Note: For the entire source code, scroll to the bottom of this post.
To keep the audience engaged (and to emphasize the “color” of the WebSocket server used for the demos – Kaazing’s color is orange), for the WebSocket demo Prashant replaced the white light bulb with an orange one.
Slides
You can also review the entire deck as presented at JavaOne.
Source Code & Download
The entire source code for the demonstration is published under David’s GitHub account. Star it, fork it, tweet it!
You can also download a free, fully functional version of the Kaazing WebSocket Gateway – JMS Edition that we used. To learn more, check out these resources:
- A Step-by-Step Tutorial of Building a Simple Peer-to-Peer WebSocket Application: A tutorial that walks you through building a simple pub-sub WebSocket application
- Kaazing’s Documentation: Full documentation on configuring the Gateway with a JMS message broker and using Kaazing’s APIs
- Remote Controlling a Car over the Web. Ingredients: Smartphone, WebSocket, and Raspberry Pi: Another awesome demo by David and Prashant, where they show how to remote control a car over WebSockets
- The Definitive Guide to HTML5 WebSocket: A book on HTML5 WebSockets, including demos (plus code) on using protocols over WebSockets
Finally, you can meet David and Prashant in person and learn more about Kaazing and our platform at the upcoming HTML5DevConf (22-23 October at Moscone North in San Francisco, CA).
Tell us about your Raspberry Pi project – and drop a comment if you’re (interested in) building Internet (or Web) of Things applications.