
In a previous post I talked about getting started with Intel Edison, and elaborated a little on a barcode scanner project I used with it. In this post I will discuss the specific architecture and crawl some code.
The barcode scanner project is interesting because the Intel Edison has wi-fi built in. This means I can run the code to communicate with the scanner, lookup UPC (Universal Product Code) data, and then pass the data along the message bus, entirely from the Edison. This is different than many other of my examples where something like an Arduino passes the data over USB to a computer, that in turn puts the data on the message bus.
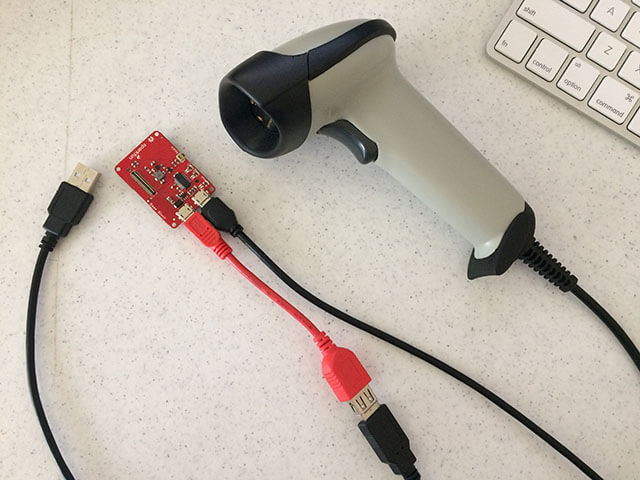
Barcode Scanner
The barcode scanner I picked up from SparkFun has an RS-232 serial communication feature. Keyboard wedge is the other common means of using a barcode scanner. The scanner comes with a cable that is a male RJ45 on one side and USB-A on the other. The Intel Edison Base Block from SparkFun has a USB Micro port. To mate the two together, I used an USB OTG cable with a female USB-A port on one side, and USB Micro on the other.
You will need to set the scanner into RS-232 mode by using the provided User’s Manual. The process starts by scanning the “PROGRAM” barcode at the top of any page. Then scan the “RS-232C” option on the “Interface Selection” section. The default baud is 9600 with 8 stop bits, no parity, and one data bit (8-N-1).
When connected to the Intel Edison, the scanner will be attached to the serial port at /dev/ttyACM0 by the Yocto Linux OS. There is no easy way to discover this. Yocto shows a long list of TTY endpoints on the file system. I was able to get it by scouring the Intel documentation, and then trial and error against a handful of endpoints using the “cat” command.
[sourcecode language=”shell” gutter=”0″]
cat /dev/ttyACM0 9600
<Scan something>
[/sourcecode]
Java
While the Intel Edison runs Node.js and Python straight out of the box, I chose Java for this project. The open source Kaazing Gateway includes Java client libraries. I am also already familiar with serial communication in Java. Java then made an ideal selection for this project.
I had reservations as to if the Edison would run Java. In the end, the Edison handled this type of Java load with ease.
Serial Communication
jSSC (Java Simple Serial Connector) is a library for communicating from Java to serial ports via JNI (Java Native Interface). The native code for communicating with serial ports is included in the JAR (Java Archive). This makes deployment and configuration a snap. So long as the jSSC JAR is in your project, or on the Java path, native serial access is yours!
There is a Java specification for native serial port access, but it has not been implemented in core Java yet. The jSSC library is also used by Arduino, making the library reliable and robust.
Serial port access consists of two parts. The first part is to open the port itself. With the port open, you then need to add an event listener for when data arrives (the barcode in this case). jSSC requires that a specific interface be implemented in order to handle events. The respective code blocks look something like the following.
[sourcecode language=”java”]
serial = new SerialPort( port );
try {
// Open serial port
// Listen for data
serial.openPort();
serial.setParams(
SerialPort.BAUDRATE_9600,
SerialPort.DATABITS_8,
SerialPort.STOPBITS_1,
SerialPort.PARITY_NONE
);
serial.addEventListener( this );
} catch( SerialPortException spe ) {
spe.printStackTrace();
}
[/sourcecode]
[sourcecode language=”java”]
// Incoming serial data
@Override
public void serialEvent( SerialPortEvent event ) {
byte[] buffer = null;
// Receiving
if( event.isRXCHAR() ) {
try {
// Latest bytes
buffer = serial.readBytes( event.getEventValue() );
for( byte b:buffer ) {
// Look for record end
if( b SERIAL_END ) {
amazon.search( builder.toString().trim() );
builder.setLength( 0 );
} else {
// Keep adding until complete record
builder.append( ( char )b );
}
}
} catch( SerialPortException spe ) {
spe.printStackTrace();
}
}
}
[/sourcecode]
Processing the incoming data really is just a matter a reading the bytes and appending those bits as character data (in this case) to a StringBuilder object. I look for a carriage return at the end of the barcode line, and then head off to Amazon to process the UPC.
Amazon
Unless you have been living under a rock for the past decade, chances are that you know Amazon provides a massive variety of developer services. One of those services is the ability to lookup products by a number of criteria – including UPC. This service used to be part of AWS (Amazon Web Services). It has since been moved under the Amazon Affiliate Program.
My usage of the service in this manner is not technically covered by the EULA. The service is designed to be used in conjunction with selling Amazon products on affiliate web sites, and is licensed as such.
Since this type of usage of the service is not part of the expected usage, there was a little digging around the documentation needed to figure out how to lookup information. Oddly enough, I found a snippet of code doing exactly that, in Java, from an Amazon employee, in the support forum. I encapsulated this code in my own wrapper for this project.
JSON
At this point we have gotten a UPC from the scanner, and looked up the product information from Amazon. Once this data is placed on the message bus, it will be headed to a web client for display. Since the web client can readily leverage JSON (JavaScript Object Notation), we will want to massage the data in Java first.
[sourcecode language=”java”]
// Process serial port data
// Send to gateway
// Send as JSON
private void process( AmazonResult scan ) {
JsonObject result;
JsonObjectBuilder builder;
StringWriter sw;
// Build JSON structure
builder = Json.createObjectBuilder();
builder.add( KEY_ACTION, ACTION_SHOW );
builder.add( KEY_UPC, scan.getUpc() );
builder.add( KEY_TITLE, scan.getTitle() );
builder.add( KEY_IMAGE, scan.getImage() );
builder.add( KEY_PRICE, scan.getPrice() );
// Encode
result = builder.build();
// Stringify
sw = new StringWriter();
try( JsonWriter writer = Json.createWriter( sw ) ) {
writer.writeObject( result );
}
// Publish message
// May not be connected yet
if( gateway.isConnected() ) {
gateway.publish( TOPIC, sw.toString() );
}
}
[/sourcecode]
Messaging Bus
This project used the open source Kaazing Gateway running for free in the cloud – a little feature we call the “Sandbox”. You can use it to test our your own ideas. It uses the Qpid message broker. I wrote a wrapper for accessing Sandbox in JavaScript and wrote about it in a previous post. For this example, I ported the wrapper over to Java. The relevant code to use the wrapper looks like the following.
[sourcecode language=”java”]
// Instantiate
gateway = new Gateway();
// Debugging
gateway.setVerbose( false );
// Event handlers
gateway.callback = new GatewayListener() {
…
@Override
public void onMessage( String body ) {
Event e = null;
InputStream stream = null;
JsonParser parser = null;
// String to InputStream
stream = new ByteArrayInputStream(
body.getBytes( StandardCharsets.UTF_8 )
);
parser = Json.createParser( stream );
// Iterate through map keys
while( parser.hasNext() ) {
e = parser.next();
if( e Event.KEY_NAME ) {
switch( parser.getString() ) {
case KEY_ACTION:
parser.next();
break;
}
}
}
}
…
};
// Connect to gateway
gateway.connect( KAAZING_ID );
// Publish message
if( gateway.isConnected() ) {
gateway.publish( TOPIC, sw.toString() );
}
[/sourcecode]
All of the action so far happens on the Intel Edison – and it happens pretty quickly. The code is packaged up into a JAR file and dropped on the Edison via SCP. It is then run using a modern JRE for Linux. We can now merrily scan barcodes all day long and send the details out over the message bus.
What is listening for those messages is up to you. That is part of the beauty of the decoupling that using a message bus brings to the table. In this case, I wanted to display the messages on a web client that would act as my shopping cart.
Web Client
The web client is probably the simplest part of the entire architecture. Getting started with Intel Edison can take some time. Learning serial port access also takes some practice (especially going into a device). JSON is pretty common, but you might be new to messaging.
By comparison, the web client waits for a message, in JSON format, and adds an element to the DOM. Handling the messaging in JavaScript uses the aforementioned JavaScript wrapper, making it easy to use and get started. Here is what handling the message in JavaScript looks like.
[sourcecode language=”java”]
// Connect to Gateway
kaazing = Gateway.connect( KAAZING_ID, doGatewayConnect );
// Called when connected to Gateway
// Subscribe to topic
function doGatewayConnect()
{
console.log( ‘Client connected.’ );
// Subscribe
kaazing.on( Gateway.EVENT_MESSAGE, doGatewayMessage );
kaazing.subscribe( TOPIC );
}
// Called when message arrives
function doGatewayMessage( message )
{
var data = null;
// Parse JSON
data = JSON.parse( message );
// Decision tree for incoming action
// Display actual scanner values
if( data.action ACTION_SHOW )
{
// Add to cart
cart.push( data );
// Update user interface
line();
total();
// Debug
console.log( data.upc );
console.log( data.title );
console.log( data.price );
console.log( data.image );
} else if( data.action ACTION_REMOVE ) {
remove( data.upc );
}
}
[/sourcecode]
That is it! Now you have yourself a real-time [IoT] barcode scanner.
Next Steps
From here I supposed you might wire the web client back into the Amazon Affiliate program to make it a legitimate use of the UPC lookup service per the license.
I originally envisioned the results of this project in two parts.
The first and most obvious part is modernization of PoS (Point of Sale) systems. The days of needing large scale PoS deployments (usually through the likes of IBM) are quickly coming to a close. There is also a cost savings as the security of Kaazing Gateway would allow retailers to use the open Internet instead of costly dedicated private lines.
The second less obvious result is a real-time supply chain. At this point the retailers internal systems can track items being sold in real-time. They can then in turn load up trucks accordingly. Or perhaps they offer specials for high demand items in real-time with digital signage. Even further might be rolling this into a frequency program to better understand consumer purchasing behaviors.
I have already started building a Java Android application that scans UPC barcodes and pushes messages into this same system. A unified PoS where the shoppers are the cashiers might make for an interesting application as well. Where will you go with it? Let me know on Twitter.